Battery switch on travel trailer function is crucial for managing your RV’s power. Understanding how these switches work, from the simple disconnect to more complex dual-battery setups, is key to avoiding electrical issues and ensuring a smooth camping experience. This guide will walk you through the different types, their operation, troubleshooting common problems, and essential safety procedures.
We’ll cover everything from connecting and disconnecting your batteries safely to performing regular maintenance and even upgrading your system. Learn how to identify problems, prevent short circuits, and keep your travel trailer’s electrical system running efficiently. Whether you’re a seasoned RVer or a newbie, this guide provides practical information and helpful tips to master your trailer’s battery management.
Battery Switch Types in Travel Trailers
Choosing the right battery switch for your travel trailer is crucial for managing your power system effectively and preventing potential electrical issues. Understanding the different types available and their functionalities will help you make an informed decision. This section will Artikel the common types of battery switches found in RVs and explain their operation.
1-2-Both Battery Switches
This is the most common type of battery switch found in travel trailers. It allows you to select between using the house battery (typically a 12V deep-cycle battery for appliances), the starting battery (for the vehicle’s engine), or both simultaneously.
| Position | House Battery | Starting Battery | Combined |
|---|---|---|---|
| 1 | Connected | Disconnected | No |
| 2 | Disconnected | Connected | No |
| Both | Connected | Connected | Yes |
The internal workings involve a rotary switch that connects or disconnects the positive leads of each battery to the main power distribution system. Selecting “1” connects only the house battery, “2” connects only the starting battery, and “Both” connects both batteries in parallel. The negative terminals are usually permanently connected.Advantages: Simple operation, versatile, good for most setups. Disadvantages: Can be prone to corrosion if not properly maintained, does not offer complete disconnection for long-term storage.
Disconnect Switches
Disconnect switches offer a complete break in the circuit, completely disconnecting the batteries from the trailer’s electrical system. This is vital for long-term storage to prevent parasitic drain and battery damage. They are usually simpler than 1-2-Both switches, offering just an “on” and “off” position.
| Position | House Battery | Starting Battery (if applicable) |
|---|---|---|
| On | Connected | Connected (if applicable) |
| Off | Disconnected | Disconnected (if applicable) |
Internally, a disconnect switch is a simple on/off mechanism that interrupts the positive lead to the batteries. Some disconnect switches might handle both the positive and negative leads for a complete isolation.Advantages: Complete battery disconnection for storage, prevents parasitic drain. Disadvantages: Less versatile than 1-2-Both switches, does not allow for simultaneous use of both batteries.
Combination Switches, Battery switch on travel trailer function
Some travel trailers utilize a combination of switches. This might involve a 1-2-Both switch for daily operation and a separate disconnect switch for long-term storage. This offers the versatility of the 1-2-Both switch and the protection of a complete disconnect.
Connecting and Disconnecting Batteries
Properly connecting and disconnecting your travel trailer batteries is crucial for safety and to prevent damage to your electrical system. A battery switch is your primary tool for this, allowing you to isolate the batteries from the trailer’s electrical system when not in use. This prevents accidental drains and potential hazards. Understanding how to use this switch correctly is vital for maintaining your RV’s electrical health.Connecting and disconnecting your travel trailer batteries using a battery switch is a straightforward process, but safety should always be your top priority.
Always ensure the switch is in the “OFF” position before making any connections or disconnections. This prevents accidental short circuits and potential sparks. Furthermore, proper handling of battery terminals will help avoid injury.
Battery Switch Operation
Before you begin, make sure the battery switch is in the OFF position. This is usually indicated by a clearly marked position on the switch itself. Next, visually inspect the battery terminals and connections for any signs of corrosion or damage. Clean any corrosion using a wire brush and baking soda solution. Then, if necessary, tighten any loose connections.
Only after these checks are complete should you proceed to connect or disconnect your batteries. To connect, simply turn the switch to the “ON” position. To disconnect, turn the switch to the “OFF” position. Always double-check the switch position after each operation.
Preventing Accidental Short Circuits
Accidental short circuits can be dangerous and potentially damaging to your battery system. To avoid this, never touch both battery terminals simultaneously. Always use insulated tools when working around batteries, and ensure your hands are dry. Before making any connections, ensure that all connections are clean and free from debris. If you notice any signs of corrosion or damage, clean and repair them before proceeding.
Never force a connection; a properly fitting connection should be secure without excessive force.
Step-by-Step Guide to Using a Battery Switch
- Verify Switch Position: Ensure the battery switch is in the “OFF” position.
- Inspect Battery Terminals: Carefully examine the battery terminals for corrosion, looseness, or damage. Clean any corrosion using a wire brush and baking soda solution.
- Tighten Connections: If necessary, tighten any loose connections using an appropriate wrench.
- Connect (or Disconnect): Turn the battery switch to the “ON” (to connect) or “OFF” (to disconnect) position.
- Verify Switch Position: Double-check that the switch is in the correct position.
- Post-Connection Check (if connecting): After connecting, briefly check your trailer’s electrical system to ensure everything is functioning correctly. For example, try turning on an interior light.
Troubleshooting Battery Switch Issues
Dealing with a faulty battery switch in your travel trailer can be frustrating, leaving you without power when you need it most. Understanding common problems and troubleshooting steps can save you time and potential headaches. This section will guide you through identifying and resolving some of the most frequent issues.
Common Battery Switch Problems and Troubleshooting Steps
Several problems can arise with your travel trailer’s battery switch. Knowing what to look for and how to systematically troubleshoot can help you pinpoint the cause quickly. A methodical approach is key to effective troubleshooting.
- No Power: This is the most common issue. The most likely culprits are a blown fuse, a faulty switch, corroded connections, or a dead battery.
- Troubleshooting Steps: First, check your fuses both at the battery and inside your trailer. Replace any blown fuses. Next, visually inspect the battery switch itself for any signs of damage or corrosion.
Clean any corrosion with a wire brush and baking soda solution. If the switch seems faulty, you may need to replace it. Finally, test your batteries with a multimeter to ensure they are charged.
- Troubleshooting Steps: First, check your fuses both at the battery and inside your trailer. Replace any blown fuses. Next, visually inspect the battery switch itself for any signs of damage or corrosion.
- Flickering Lights: Flickering lights often indicate loose connections or a problem with the wiring itself. Sometimes, a low battery charge can also cause this.
- Troubleshooting Steps: Begin by carefully checking all connections at the battery, the switch, and any junction boxes along the wiring path. Tighten any loose connections. Look for any damaged or frayed wires and repair or replace them as needed.
Finally, check your battery’s charge level; a low charge can cause lights to flicker.
- Troubleshooting Steps: Begin by carefully checking all connections at the battery, the switch, and any junction boxes along the wiring path. Tighten any loose connections. Look for any damaged or frayed wires and repair or replace them as needed.
- Switch Stuck in One Position: A switch that’s stuck either on or off can be caused by mechanical failure within the switch itself or by debris interfering with its movement.
- Troubleshooting Steps: Try gently working the switch back and forth. If it’s stuck, avoid excessive force. If the switch remains unresponsive, it likely needs to be replaced. If you suspect debris, carefully inspect and clean the switch mechanism, but only if you’re comfortable doing so and understand the risks.
Troubleshooting Flowchart for a Non-Functional Battery Switch
A visual guide can be helpful in systematically troubleshooting a non-functional battery switch. The following flowchart Artikels a step-by-step approach:Imagine a flowchart with boxes and arrows.* Start: Is there power to the trailer?
Yes
So, you’re an audiophile who travels? Awesome! Check out this guide on building the perfect audiophile travel setup for amazing sound on the go. It’s all about finding the right balance of portability and quality. Then, if you need more tips and tricks for your portable audio setup, explore this other resource on audiophile travel aetup to discover even more ways to enhance your listening experience while you travel.
Remember, great sound doesn’t have to stay at home!
Proceed to the next step.
No
Check the main power source (shore power or generator). If there’s still no power, investigate the power source itself, not the battery switch.* Check Fuses: Are all fuses intact?
Yes
Proceed to the next step.
No
Replace blown fuses and retest.* Inspect Battery Connections: Are the battery connections clean and tight?
Yes
Proceed to the next step.
No
Clean and tighten connections. Retest.* Inspect Battery Switch: Is the battery switch operating correctly? (Can you hear/feel it click when moved?)
Yes
Check battery voltage. If low, charge batteries.
No
Replace the battery switch.* Check Battery Voltage: Are the batteries adequately charged?
Yes
The problem lies elsewhere in the system.
So, you’re an audiophile who travels? Awesome! Check out this guide on creating the perfect audiophile travel setup for amazing sound on the go. It’s all about packing smart, choosing portable but high-quality gear, and understanding how your environment impacts sound. Then, once you’ve got your travel setup dialed in, explore more advanced tips by looking at another resource on audiophile travel setups to really fine-tune your listening experience, no matter where you are.
Remember, great sound shouldn’t be limited by your location!
No
Charge the batteries.
Battery Switch Maintenance: Battery Switch On Travel Trailer Function
Keeping your travel trailer’s battery switch in good working order is crucial for reliable power. Regular maintenance prevents costly repairs and ensures your batteries are properly connected and protected. Neglecting maintenance can lead to corrosion, poor connections, and even battery damage. A simple maintenance schedule can save you significant headaches down the road.Regular maintenance of your battery switch involves a straightforward process that should be performed at least twice a year, or more often if you live in a particularly humid or salty environment.
This routine inspection will ensure the longevity of your battery switch and prevent unexpected power outages while you’re enjoying your adventures.
Battery Switch Inspection Schedule
A simple schedule helps ensure consistent maintenance. Consider inspecting your battery switch every six months, or before and after each extended travel season. This frequency will vary depending on your usage and environment. For example, if you store your trailer outdoors in a coastal area, more frequent inspections are recommended due to increased exposure to salt and moisture. A more frequent schedule, such as quarterly inspections, might be suitable for such conditions.
Inspecting for Corrosion and Damage
Visually inspect the battery switch and its connections for signs of corrosion. Corrosion appears as a greenish-white or bluish-white powdery substance. Look closely at the terminals, the switch itself, and any connecting wires. Loose connections are another common problem; gently wiggle each wire to check for looseness. Any signs of physical damage, such as cracks or broken parts on the switch housing, should also be noted.
Pay close attention to the positive (+) and negative (-) terminals; these are the most susceptible to corrosion due to the chemical reactions that occur with battery acid. If you notice significant corrosion, it’s best to clean it immediately to prevent further damage and ensure proper electrical conductivity.
Battery Switch and Wiring Maintenance Checklist
Before beginning any maintenance, always disconnect the negative (-) battery terminal to prevent accidental short circuits. This is a crucial safety precaution.
- Visual Inspection: Carefully examine the battery switch and all connecting wires for corrosion, loose connections, or physical damage.
- Corrosion Cleaning: If corrosion is present, use a wire brush or a specialized battery terminal cleaner to remove it. Apply a corrosion inhibitor to prevent future corrosion.
- Connection Tightness: Ensure all wire connections are securely tightened. If necessary, use appropriate-sized wrenches to tighten the nuts and bolts.
- Switch Operation: Test the switch to ensure it operates smoothly and correctly switches power on and off.
- Wiring Condition: Check the wiring for any signs of fraying, cuts, or damage. Replace any damaged wiring immediately.
- Protective Coating: Apply a dielectric grease or protective coating to the terminals to help prevent future corrosion.
- Reconnect Battery: Once the inspection and cleaning are complete, reconnect the negative (-) battery terminal.
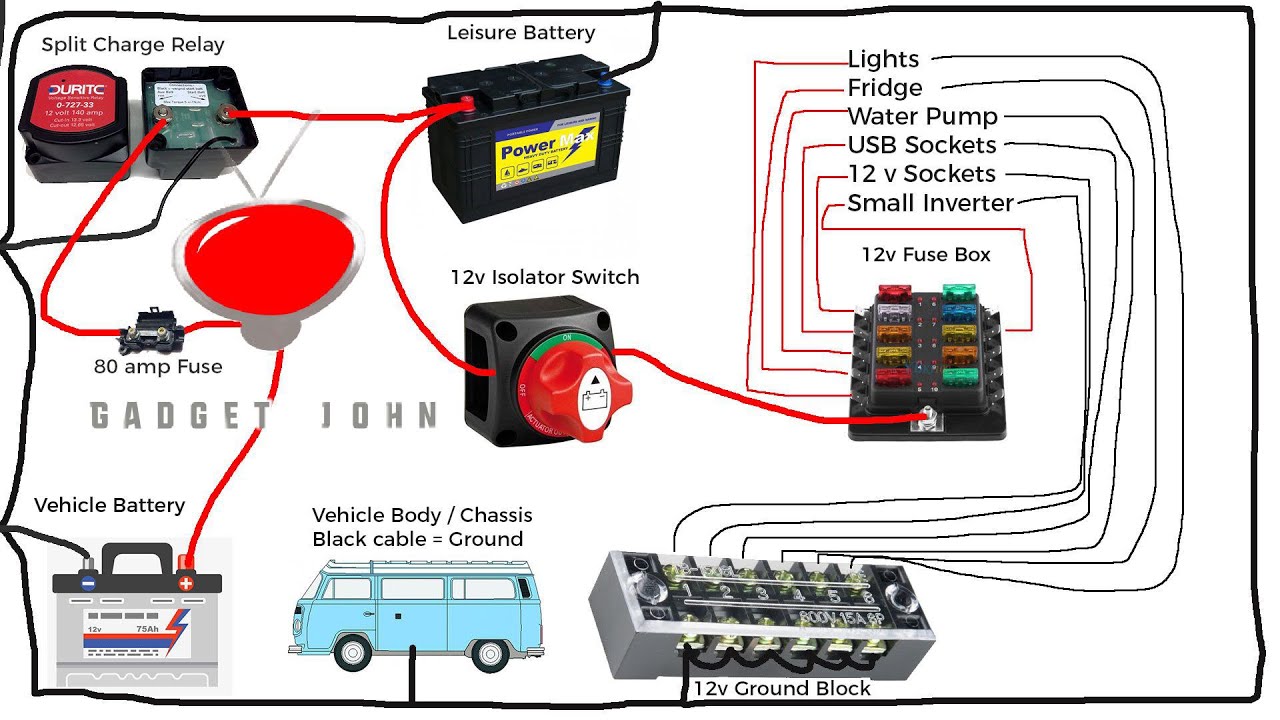
Battery Switch and Electrical System Integration
Your travel trailer’s battery switch acts as the central control point for your 12-volt DC power system. Understanding its relationship with other electrical components is key to troubleshooting and maintaining your trailer’s power. This section details how the switch interacts with various parts of your electrical system, including the converter, inverter, and your 12V and 120V appliances.The battery switch is the gateway between your trailer’s batteries and the rest of its electrical system.
When the switch is in the “on” position, it allows the batteries to power various 12V DC appliances directly, such as interior lights, water pumps, and some refrigerators. Simultaneously, it also allows the converter to charge the batteries from the 120V AC shore power or generator. The converter takes the 120V AC power and transforms it into the 12V DC power needed for charging the batteries and powering DC appliances.
If you’re using an inverter, this device converts the 12V DC power from your batteries into 120V AC power, enabling you to run AC appliances when not connected to shore power. The battery switch effectively controls the flow of power from the batteries to these crucial systems.
Converter Interaction
The converter continuously monitors the battery’s charge level. When shore power is connected and the battery switch is on, the converter charges the batteries. A faulty battery switch could prevent the converter from properly charging the batteries, leading to low battery voltage and impacting the performance of 12V appliances. For example, a switch that’s always in the “off” position, regardless of the shore power connection, will prevent charging, even with a fully functional converter.
Conversely, a switch that’s stuck in the “on” position might lead to over-discharge if you’re not using shore power regularly, potentially damaging the batteries.
Inverter Interaction
The inverter draws power directly from the batteries. A properly functioning battery switch is crucial for safe and reliable inverter operation. If the switch is faulty and intermittently cuts power, the inverter might shut down unexpectedly, interrupting the operation of any connected 120V AC appliances. Similarly, a permanently off switch renders the inverter useless, while a switch that’s always on could drain the batteries quickly when running power-hungry AC appliances like microwaves or air conditioners.
Impact of a Faulty Battery Switch on Electrical System Functionality
A faulty battery switch can significantly affect your trailer’s electrical system. Here are some examples:
- Inconsistent power: Intermittent power to appliances due to a faulty switch causing inconsistent contact.
- Complete power loss: A completely broken switch results in no power to any 12V or (inverter-dependent) 120V appliances.
- Battery drain: A switch stuck in the “on” position can lead to rapid battery discharge, even when not using appliances.
- Failure to charge batteries: A faulty switch prevents the converter from charging the batteries, leaving you with a dead battery bank.
- Overheating: A faulty switch can cause excessive heat build-up, potentially damaging the switch itself or nearby wiring.
Upgrading or Replacing a Battery Switch

Upgrading your travel trailer’s battery switch can significantly improve its functionality and reliability. A more advanced switch offers better control over your power system, potentially adding features like improved safety mechanisms and easier management of multiple battery banks. Replacing a faulty or outdated switch is crucial for preventing electrical problems and ensuring the longevity of your RV’s electrical system.Choosing the right replacement or upgrade depends on your needs and the existing setup.
Factors like the number of batteries, amperage requirements, and desired features should all be considered.
Battery Switch Upgrade Considerations
Selecting a new battery switch involves careful consideration of several key factors. Amperage rating is paramount; it must exceed the combined amperage draw of all connected appliances and batteries. Features like individual battery bank switching, a built-in circuit breaker, or a remote control panel can greatly enhance convenience and safety. Finally, the physical size and mounting style must match your existing setup or allow for easy adaptation.
Consider whether you need a simple on/off switch or a more sophisticated system with multiple switching options for different battery banks (e.g., a 3-position switch for house batteries, chassis batteries, and a combined mode).
Replacing a Battery Switch: A Step-by-Step Guide
Before beginning any electrical work, always disconnect the negative terminal from your batteries to prevent accidental shocks or short circuits. This is a crucial safety precaution.
- Identify the existing switch and its wiring: Carefully examine the current battery switch to determine its amperage rating and wiring configuration. Take photos or make detailed notes of the wiring connections before disconnecting anything. This will be crucial for reinstallation.
- Gather necessary tools and materials: You will need screwdrivers (likely Phillips and flathead), wire strippers/cutters, crimpers (if using new connectors), wire nuts, and potentially a multimeter for testing. Always have a replacement switch of appropriate amperage and type on hand.
- Disconnect the wiring: Carefully disconnect all wires from the old switch, labeling each wire clearly with tape and a marker to correspond with your notes or photos. This ensures proper reconnection later.
- Remove the old switch: Once the wires are disconnected, remove the old battery switch from its mounting location. This may involve removing screws or bolts.
- Install the new switch: Mount the new battery switch in the same location as the old one. Ensure it is securely fastened.
- Reconnect the wiring: Carefully reconnect the wires to the new switch, following the labeling and your diagram. Ensure proper connections to avoid short circuits. Double-check all connections before proceeding.
- Test the new switch: After reconnecting the wires, reconnect the negative battery terminal. Test the new switch to ensure all functions are working correctly. Use your multimeter to verify the correct voltage at each terminal if needed.
Wiring Diagram Example
The following table provides a simplified example of a wiring diagram. Adapt this to match your specific switch and system. Always consult the wiring diagram provided with your new switch for accurate instructions.
| Wire Color | Source | Old Switch Terminal | New Switch Terminal | Destination |
|---|---|---|---|---|
| Red | Positive Battery Terminal (House Bank) | 1 | 1 | House Load Center |
| Black | Negative Battery Terminal (House Bank) | 2 | 2 | House Load Center |
| Red | Positive Battery Terminal (Chassis Bank) | 3 | 3 | Chassis Load Center |
| Black | Negative Battery Terminal (Chassis Bank) | 4 | 4 | Chassis Load Center |
Safety Precautions Related to Battery Switches
Working with batteries and electrical systems in a travel trailer can be risky if proper safety precautions aren’t followed. Improper handling of a battery switch, or any part of the electrical system, can lead to serious injury, including electric shock, burns, and even explosions. This section details crucial safety measures to ensure a safe and problem-free experience.Improper use or maintenance of a battery switch presents several hazards.
A poorly maintained switch can overheat, potentially causing a fire. Incorrectly connecting or disconnecting the switch can result in short circuits, leading to sparks, melted wires, and potentially damaging other components of the electrical system. Furthermore, working with batteries without proper precautions exposes you to the risk of corrosive acid burns from battery leakage, and the potential for hydrogen gas explosions, especially if you are working near a spark or flame.
Potential Hazards of Battery Switch Misuse
Incorrectly operating the battery switch can have severe consequences. For example, accidentally leaving the switch on while the trailer is disconnected from power could drain your house batteries completely, rendering your appliances unusable. Conversely, failing to turn off the switch before performing maintenance or repairs on the electrical system could result in a potentially fatal electric shock. A poorly wired or damaged battery switch could overheat, leading to melting wires and potentially a fire, especially in confined spaces like a travel trailer’s battery compartment.
Ignoring these risks can lead to significant damage to your trailer’s electrical system, necessitating costly repairs.
Safety Tips for Working with Travel Trailer Batteries and Electrical Systems
Before undertaking any work on your travel trailer’s electrical system, always disconnect the negative (-) battery cable first. This helps prevent accidental short circuits. Wear appropriate safety glasses to protect your eyes from sparks or corrosive battery acid splashes. Always have a fire extinguisher readily available, particularly a type that is effective against electrical fires. When working with the battery switch or any electrical components, ensure the area is well-ventilated to prevent the build-up of potentially explosive hydrogen gas.
Never work on the electrical system while it’s raining or in damp conditions. If you are unsure about any procedure, consult a qualified electrician specializing in RV electrical systems.
Consequences of Incorrect Procedures
Consider a scenario where you attempt to connect a battery without properly securing the cable clamps. A loose connection can create a spark, potentially igniting flammable materials near the battery. This could lead to a fire, causing significant damage to your travel trailer, and possibly resulting in serious injury or even death. Similarly, neglecting to turn off the battery switch before working on the wiring could expose you to a dangerous electrical shock.
The severity of this shock depends on the voltage and amperage, but even a minor shock can be painful and disorienting, potentially causing you to fall and injure yourself further. Remember, preventative measures are crucial to mitigate these risks.
Mastering your travel trailer’s battery switch is more than just flipping a switch; it’s about understanding your RV’s electrical system and ensuring safe, reliable power. By following the maintenance tips and troubleshooting steps Artikeld here, you can prevent costly repairs and enjoy worry-free adventures. Remember, safety is paramount when working with batteries and electricity—always prioritize safe practices and consult a professional if you’re unsure about any procedure.
FAQ Explained
What happens if I leave my battery switch on all the time?
Leaving your battery switch on constantly can drain your batteries, especially if you have parasitic draws (small electrical loads even when the trailer is off). It’s best to turn it off when not using the trailer for extended periods.
How do I know which battery switch I have?
Check the switch itself for markings or a diagram. You can also consult your travel trailer’s owner’s manual. Common types include 1-2-both switches and simple on/off disconnects.
My battery switch is making a clicking noise. What’s wrong?
A clicking noise often indicates a loose connection or a problem with the switch itself. Inspect for corrosion or loose wiring. If the problem persists, replace the switch.
Can I use a different type of battery switch than what came with my trailer?
Yes, but ensure the new switch has the correct amperage rating and is compatible with your trailer’s electrical system. Consult a professional if you’re unsure.
